The CS1010 Programming Environment
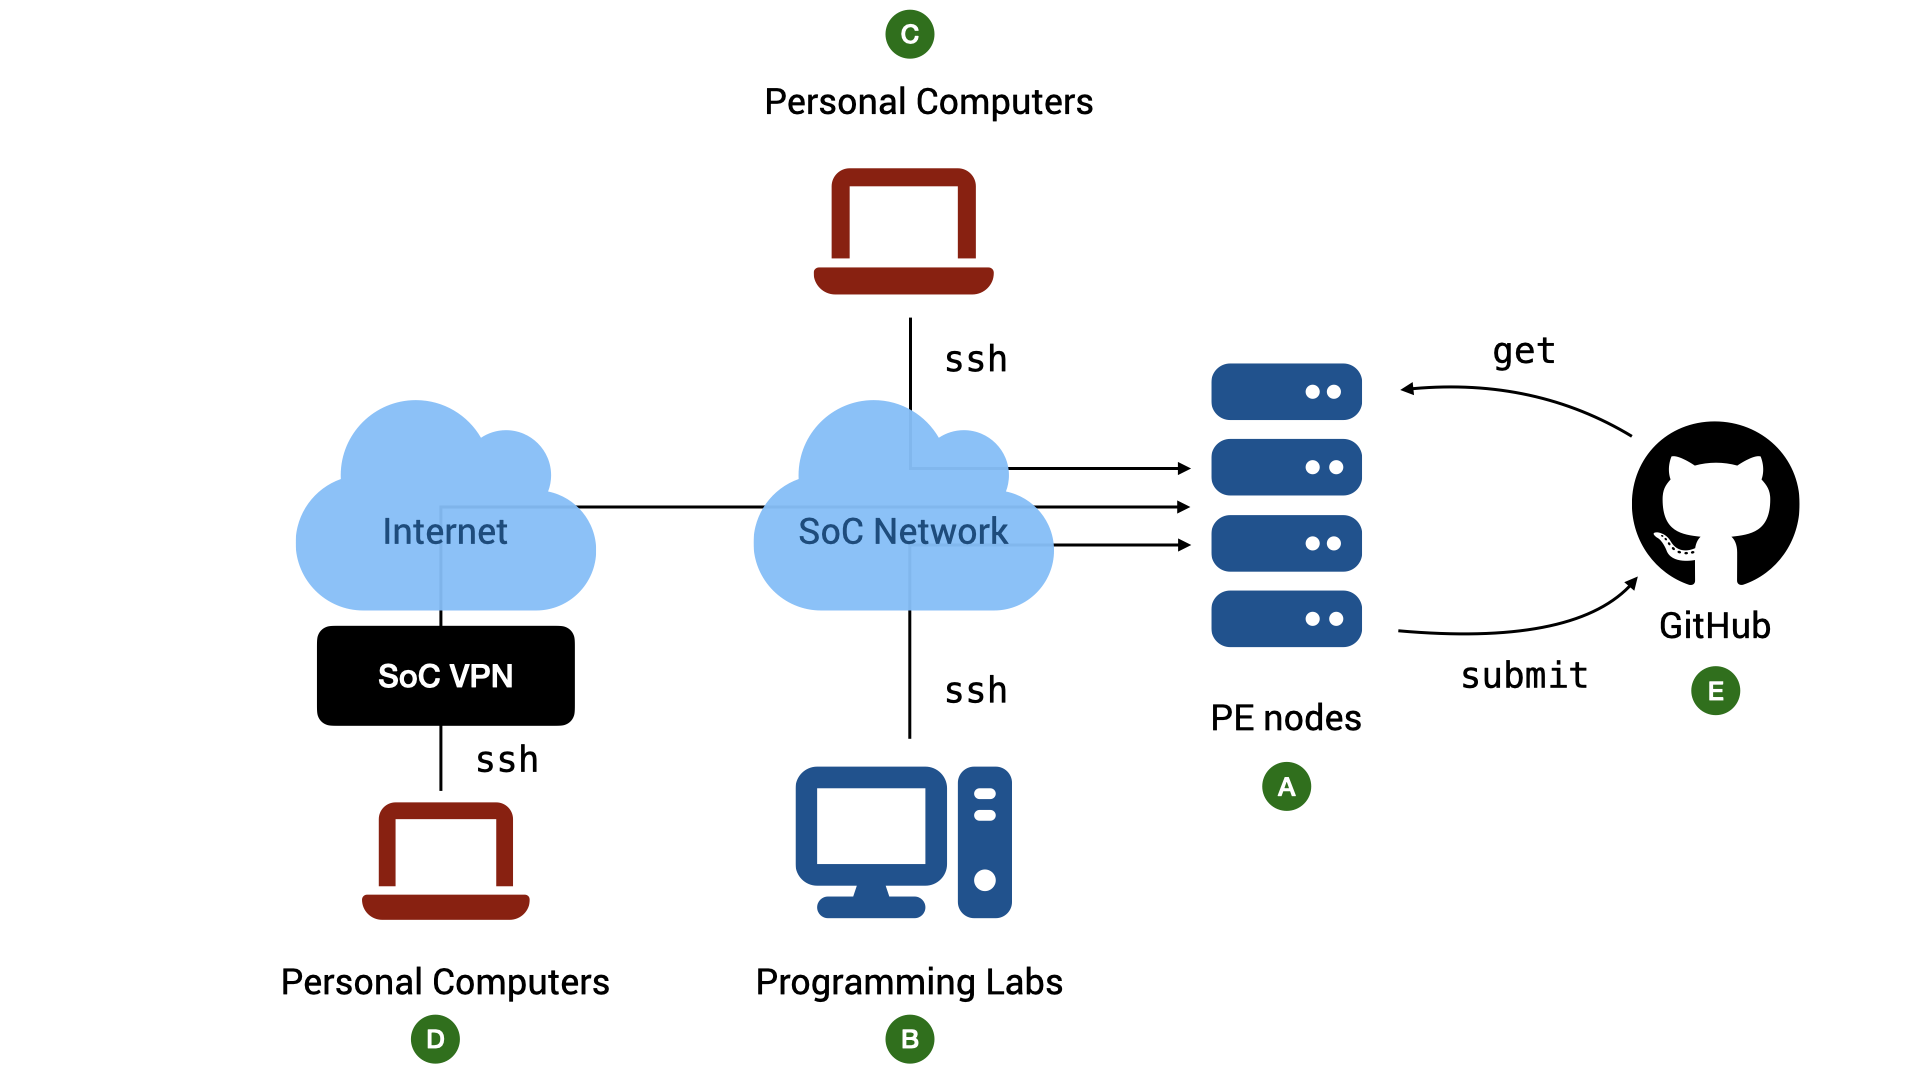
OS and Compiler
C is a common programming language. You can find different implementations of a C compiler on many platforms. Wikipedia lists more than 40 different C compilers. These different compilers support different processor architectures and operating systems and may behave slightly differently as well as support different features of C standards. It is therefore important for CS1010 to stick to a single platform and single compiler.
Our platform of choice is Ubuntu 24.4. using the clang compiler (version 18.0 or later).
PE Nodes
The school has provided a list of computing servers with the above environments for you to use ( in Figure 1). The nodes are accessible via pelogin. (pe stands for "programming environment"). We will refer to these servers generally as the PE nodes.
You will be automatically assigned to one of the nodes when you login. You share the same home directory across all the nodes (this home directory, however, is different from that of stu).
For simplicity, the following guide uses xcnd0, which is one of the pe nodes, in all examples.
Accessing PE Nodes
While you could complete your programming assignments on your own computers, the practical exams are done in a controlled environment using exam servers similar to the PE nodes. It is therefore advisable for you to familiarize yourself with accessing the PE nodes via ssh and complete all your exercises on PE nodes.
Account
Basic requirements:
-
To access the nodes, you need an SoC Unix account. If you do not have one, you can apply for one online.
-
Once you have an account, you need to activate your access to the PE nodes, which are part of the SoC computer clusters.
-
To access PE Nodes from your computer ( or in Figure 1) you need
- a command line
sshclient. Windows 10/11, macOS, and Linux users should already havesshinstalled by default. If your OS does come withssh(i.e., it cannot find thesshcommand when you typesshinto your terminal), look for instructions on how to install OpenSSH client on your operating system. - a terminal emulator. The default terminal emulator that comes with Windows and Mac supports only basic features. For Windows 10/11 users, CS1010 recommends either PowerShell (pre-installed) or Windows Terminal. For macOS users, CS1010 recommends iTerm2.
- For older versions of Windows, you can check out XShell 7 (free for home/school use), or PuTTY. These are GUI-based programs, so the command lines instructions below do not apply.
- a command line
The Command to SSH
You can access them remotely via ssh (Secure SHell).
To connect to a remote host, run the following in your terminal on your local computer:
1 | |
Replace <username> with your SoC Unix username and <hostname> is pelogin.comp.nus.edu.sg. For instance, I would do:
1 | |
After the command above, follow the instructions on the screen.
The first time you ever connect to pelogin.comp.nus.edu.sg, you will be warned that you are connecting to a previously unknown host. Answer yes.
After that, you will be prompted with your SoC Unix password. Note that nothing is shown on the screen when your password is being entered.

Accessing The PE Nodes from Outside SoC
The PE nodes can only be accessed from within the School of Computing networks. If you want to access it from outside, you need to connect through SoC VPN ( in Figure 1).
First, you need to set up a Virtual Private Network (VPN) (See instructions here). The staff at the IT helpdesk in COM1, Level 1, will be able to help you with setting up if needed. You can also contact them via the NUS IT RT system at https://rt.comp.nus.edu.sg.
SoC VPN vs NUS VPN
Note that SoC VPN is different from NUS VPN. Connecting to NUS VPN only allows you access to the NUS internal network, but not the SoC internal network.
Accessing The PE Nodes from SoC Lab PCs
CS1010 practical exams will be conducted in the programming labs in COM1, COM4, and AS6 using the Ubuntu environment on the lab PCs. Students are advised to use the lab PCs during regular lab sessions to familiarize themselves with the environment ( in Figure 1).
To access the PE nodes from the lab PCs during lab sessions:
- Boot into Ubuntu if the PC is not already running Ubuntu
- Log into the PC using the SoC Unix account
- Launch the terminal and use
sshcommand above.
Warning
The local home directory on the lab PCs will be cleaned regularly. Do not expect that files stored in the lab PCs to be persistent. You can copy your files to external drive, to your home directory on the PE nodes, or to a cloud storage.
Copying Files between PE Nodes and Local Computer
Secure copy, or scp, is one way to transfer files between the programming environments and your local computer. scp behaves just like cp (see Unix: Essentials). The command takes in two arguments, the source and the destination. The difference is that we use the <username>@<hostname>:<filename> notation to specify a file on a remote host.
Let's say you want to transfer a set of C files from the directory a01 to your local computer, then, on your local computer. You run:
1 | |
pelogin" vs "xlogin
Note that scp is disabled on pelogin. That why xlogin is used here instead.
Despite some differences in the setup, the two servers share a few similarties including the login credentials and the user home directories. If you copy a file to xlogin, you will be able to access the file in pelogin as well.
Warning
If you have files with the same name in the remote directory, the files will be overwritten without warning. I have lost my code a few times due to scp.
The expression *.c is a regular expression that means all files with filename ending with .c (see Advanced Topics on Unix).
You can copy specific files as well. For instance, to copy the file hello.c from your local computer to your ~/a01 directory:
1 | |
scp supports -r (recursive copy) as well.
Note that we always run scp on your local computer in the examples above, since the SSH server runs on the PE nodes.
Setting up Password-less Login for the PE Node
The next step is not required but is a time-saver and a huge quality-of-life improvement. You need to be familiar with basic Unix commands, including how to copy files to remote hosts (using scp) and how to check/change file permissions (using ls -l and chmod). If you are still not comfortable with these commands, make sure you play with the basic Unix commands first. You can come back and complete this step later.
Basic of SSH Keys
SSH uses public-key cryptography for authentication. The keys come in pairs: a public key and a private key. The private key must be kept safe and known only to you. You should keep the private key in your PE account, and not share it with others.
To authenticate yourself to another host or service, you configure the host/service with your public key. When it is time for you to log in, your private key is "matched"1 with your public key. Since only you know your private key, the service or the host can be sure that you are you and not someone else.
Suppose you want to log in from host X to host Y without a password. You generate a pair of keys on X, then keep the private keys on X and store the public keys on Y.
For example, you can generate the pair of keys on your computer (e.g., X) and then copy the public key to the CS1010 PE node (Y).
Afterwards, you will be able to log into the PE node from your computer without a password,
Generating SSH Keys
To do so, you can use the following command on your local computer:
1 | |
The command will prompt you where to save the key. Just press Enter to save into the default location.
You will then be prompted for a passphrase. Since our goal is to connect to the PE node without needing to type anything, you should enter an empty passphrase. This increases the security risk, but then, we are working with CS1010 exercises here, not a top-secret project. So an empty passphrase will do.
You should see something like this:
1 2 3 4 5 6 7 8 9 10 | |
Take note of the
Adding the Public Key to the PE Node
Copy the public key id_rsa.pub to your home directory on xlogin using scp.
The command should look like
1 | |
After copying, ssh into pelogin and run
1 | |
If there are permission errors, make sure that the permission for the directory .ssh both on the local machine and on the PE node is set to 700 and the files id_rsa on the local machine and authorized_keys on the pe node are set to 600. Once set up, you need not enter your password every time you run ssh or scp.
For Windows Users
On Windows, the equivalent of chmod is icacls. While the default permission should work without you doing anything, but if needed, you can change the permission with
1 | |
Checking Your Authentication Settings
To check if you can connect to the PE node using SSH keys, simply exit the PE node and try connecting to it again.
If everything is set up correctly, you will be able to login without a password.
Stability of Network Connection
Note that a stable network connection is required to use the PE nodes for a long period without interruption. If you encounter frequent disconnections while working at home or on campus while connected wirelessly, please make sure that your Wi-Fi signal is strong and that there is no interference from other sources.
If your connection is disconnected in the middle of editing, vim saves the state of the buffer for you. See the section on recovery file on how to recover your files.
If you experience frequent disconnection, you can consider running screen. After logging into a PE node, run:
1 | |
You will see some messages, press Enter to go to the command prompt. You can now use the PE node as usual. In case you are disconnected (e.g., in the middle of editing), you can log into the same PE node again, and run:
1 | |
to resume your previous session.
Troubleshooting
Suppose you try to connect to pelogin using:
1 | |
-
ssh: Could not resolve hostname pelogin.comp.nus.edu.sgsshcannot recognize the namepelogin, it is likely that you are not connected to the SoC VPN. -
Connection closed by 192.168.48.xxx port 22You have connected to the PE node, but you are kicked out because you have no permission to use the node.
Make sure you have activated your access to "SoC computer clusters" here: https://mysoc.nus.edu.sg/~myacct/services.cgi
-
Permission denied, please try againYou did not enter the correct password or username. Please use the username and password of your SoC Unix account which you have created here: https://mysoc.nus.edu.sg/~newacct/.
Check that you have entered your username correctly. It is case-sensitive.
If you have lost your password, go here: https://mysoc.nus.edu.sg/~myacct/resetpass.cgi
-
Could not chdir to home directory /home/o/zhaojin: Permission deniedThis error means that you have successfully connected to the PE nodes, but you have no access to your home directory.
This should not happen. Please submit a IT service request with the above error message via https://rt.comp.nus.edu.sg, including the PE hosts that you connected to with this error and your username. The system administrator can reset the permission of your home directory for you.
-
I skipped many cool details here. This topic is part of CS2105 and CS2107. Interested students can search for various articles and videos online about how public-key cryptography is used for authentication. ↩